Flying Dutchman G, H, & I.

I’m in a bit of a weird state right now with the Flying Dutchman build. 

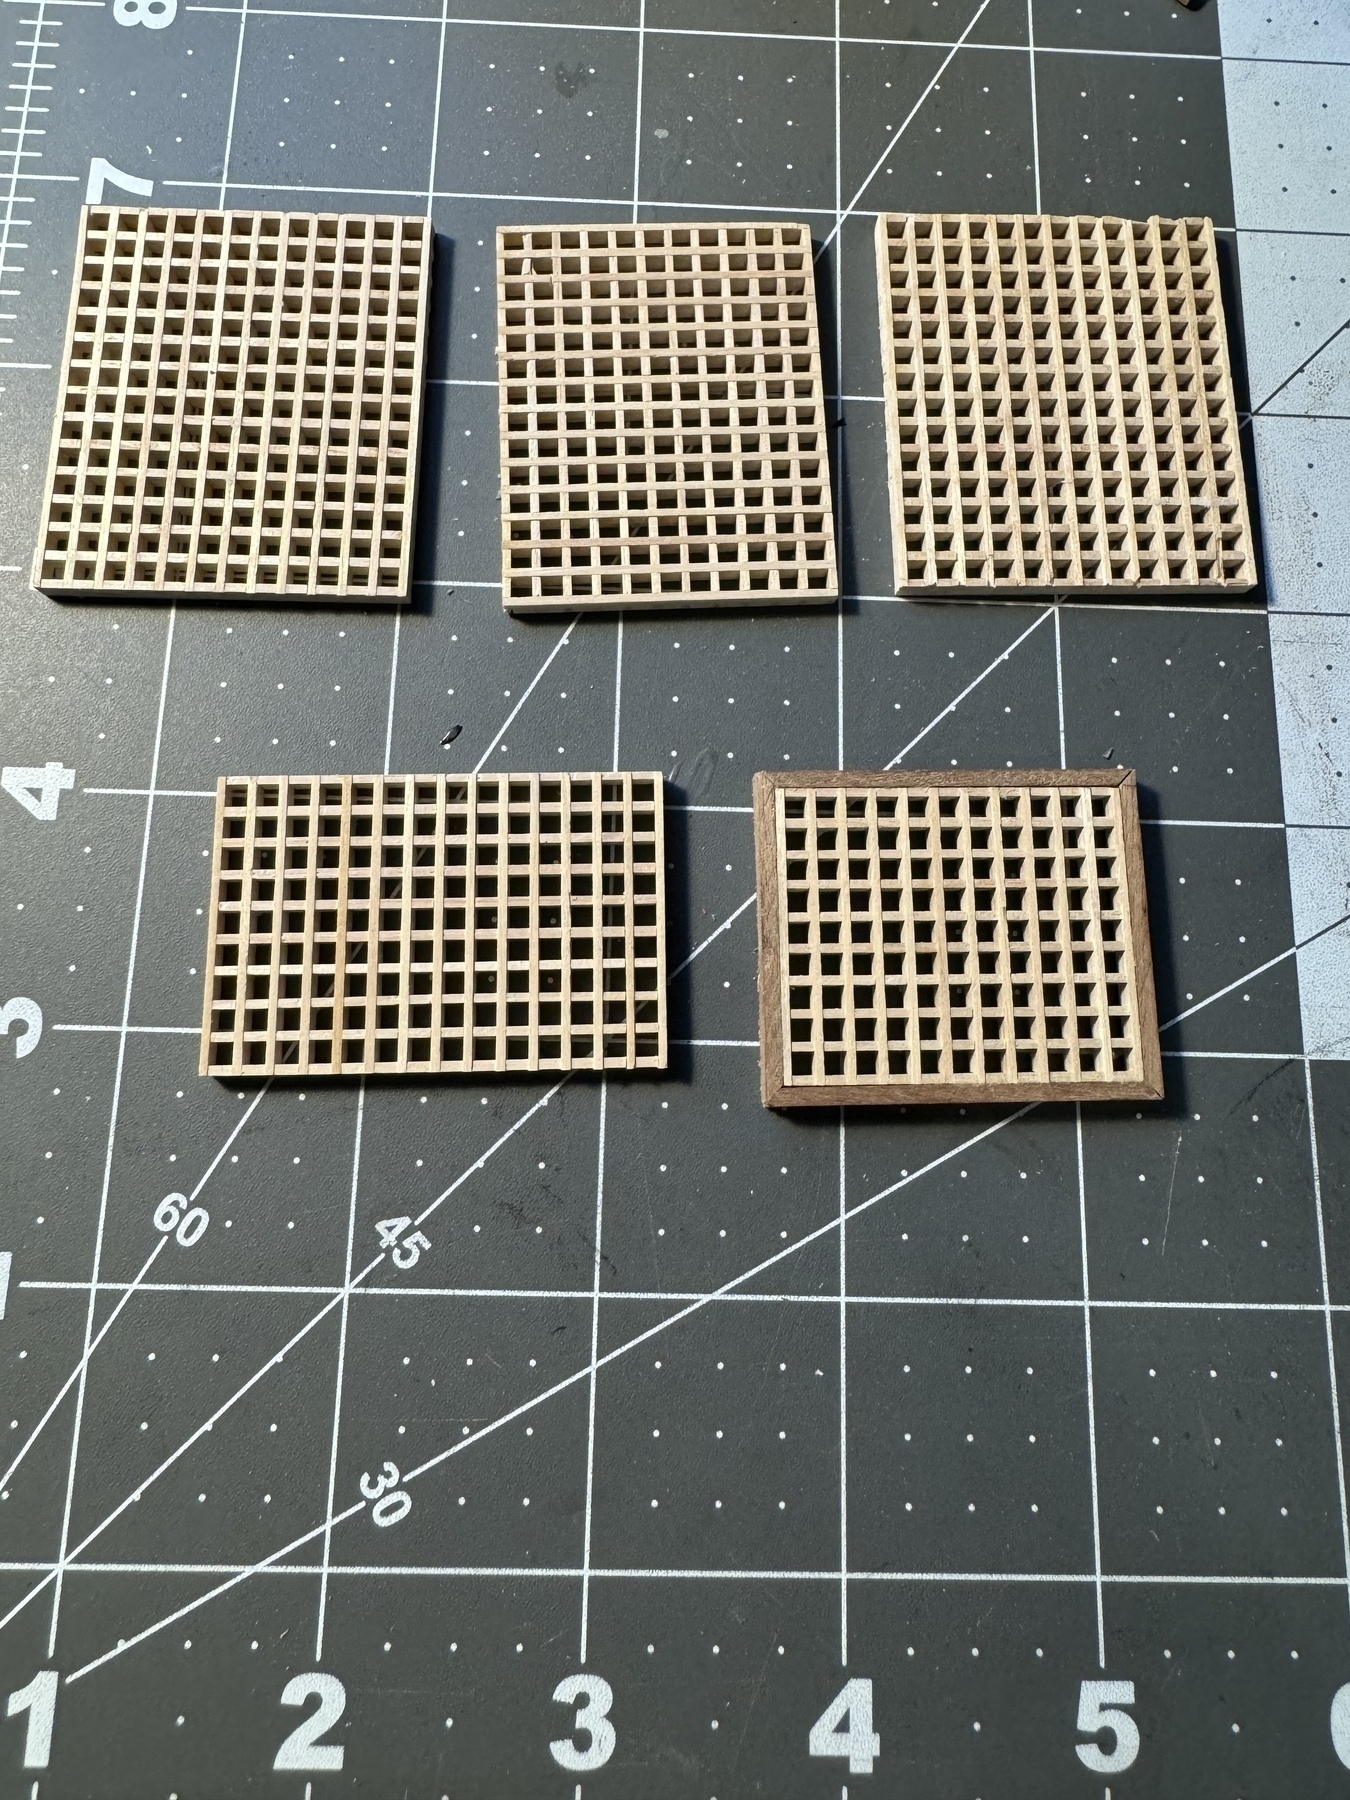
In Step G, I needed to build some grates like this: 

Small wood gratings to be used on the deck of the Flying Dutchman model.

I’m supposed to outline each one in mahogany like the one in the bottom-right. But, the kit didn’t include enough to do that so I had to order some. Despite the company I ordered from saying they were in the US, my wood is coming from Australia. 

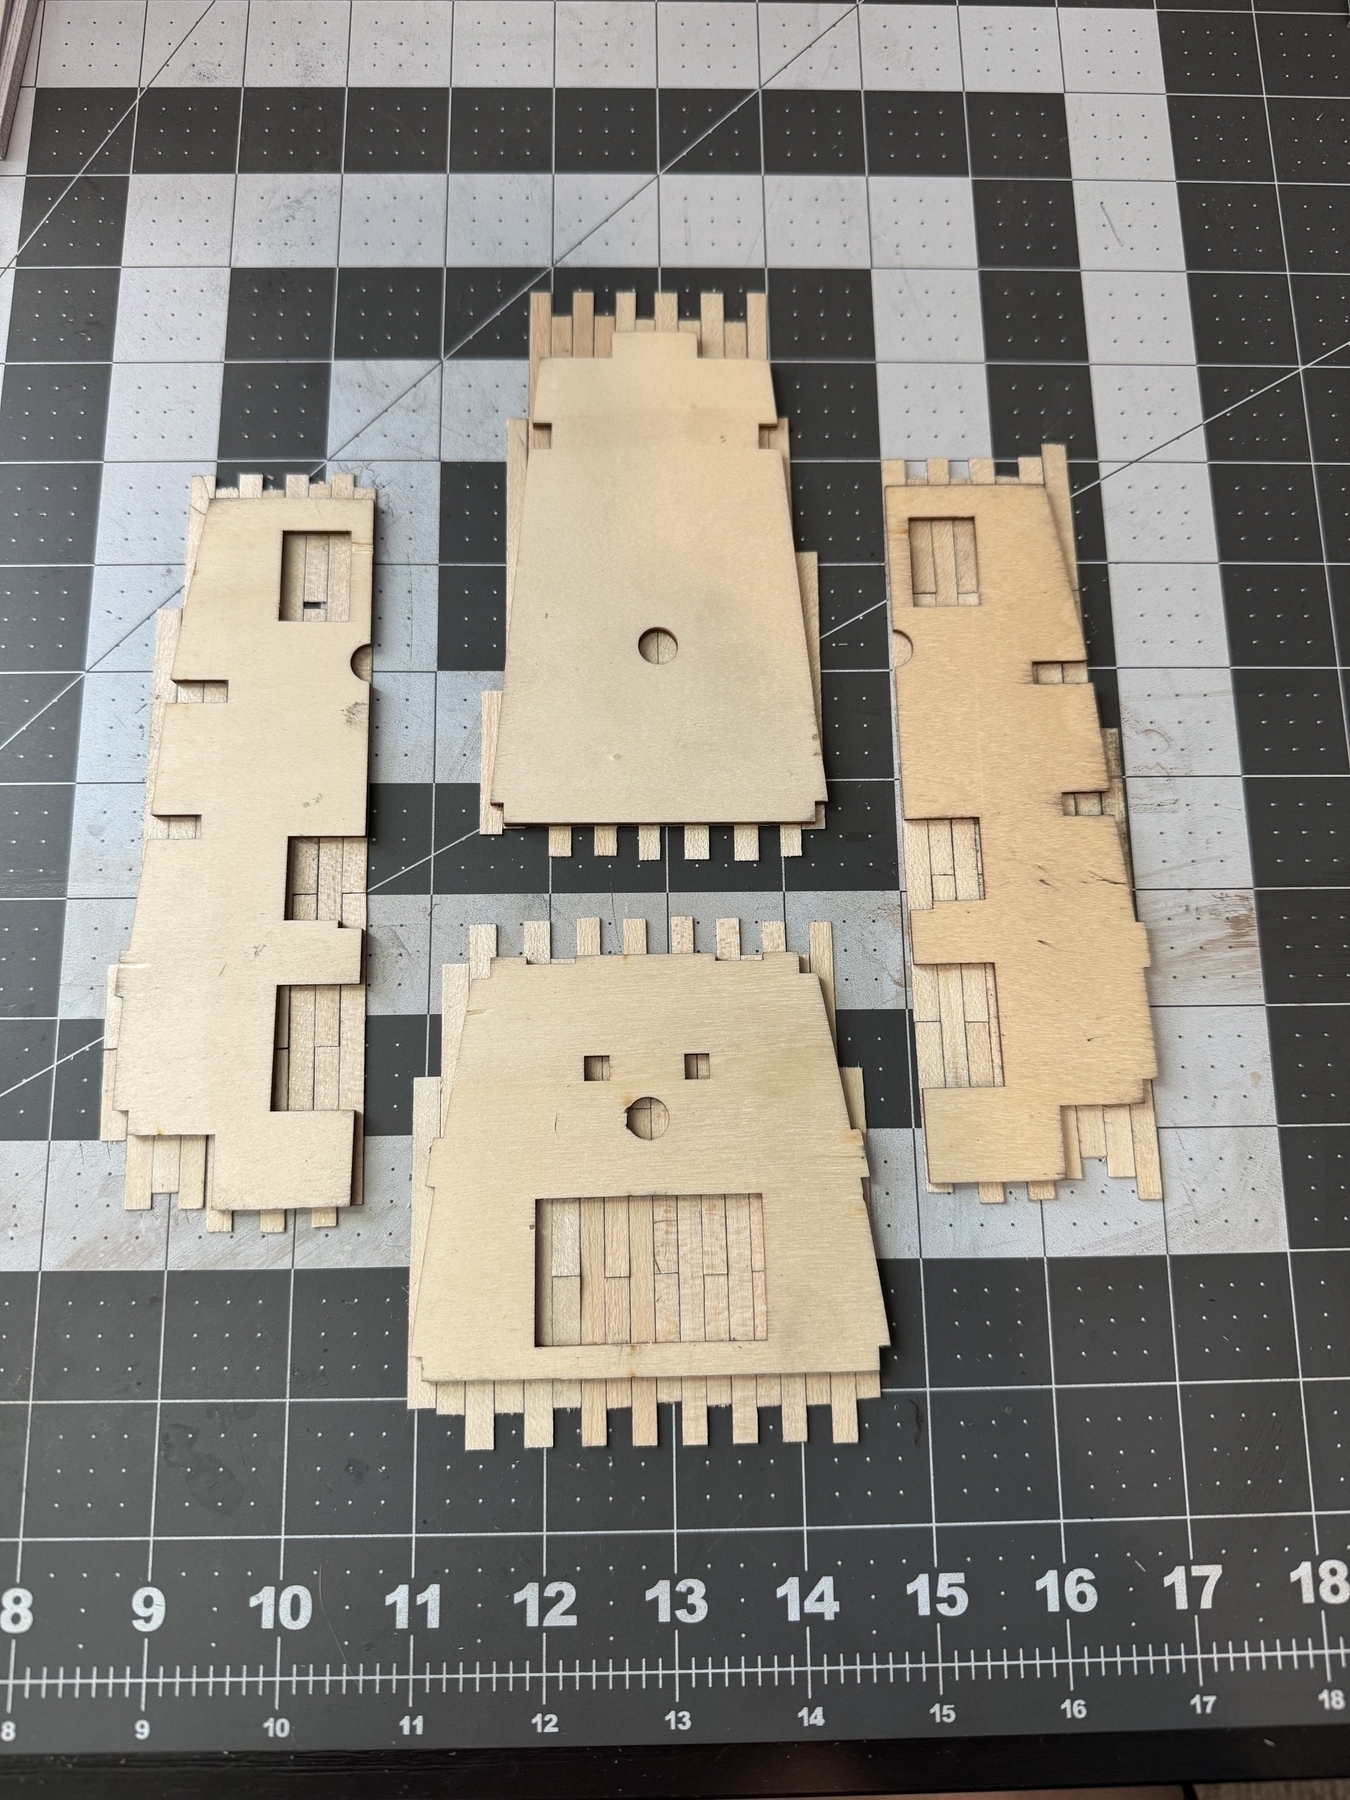
So I moved ahead to Step H. In that step, I needed to build a small deck housing and install the grates on the deck. Well, OK, I can build the deck house. It looks like this: 

Small deck house with roof that goes on one of the upper decks of the flying dutchman model ship

Cute, isn’t it? 

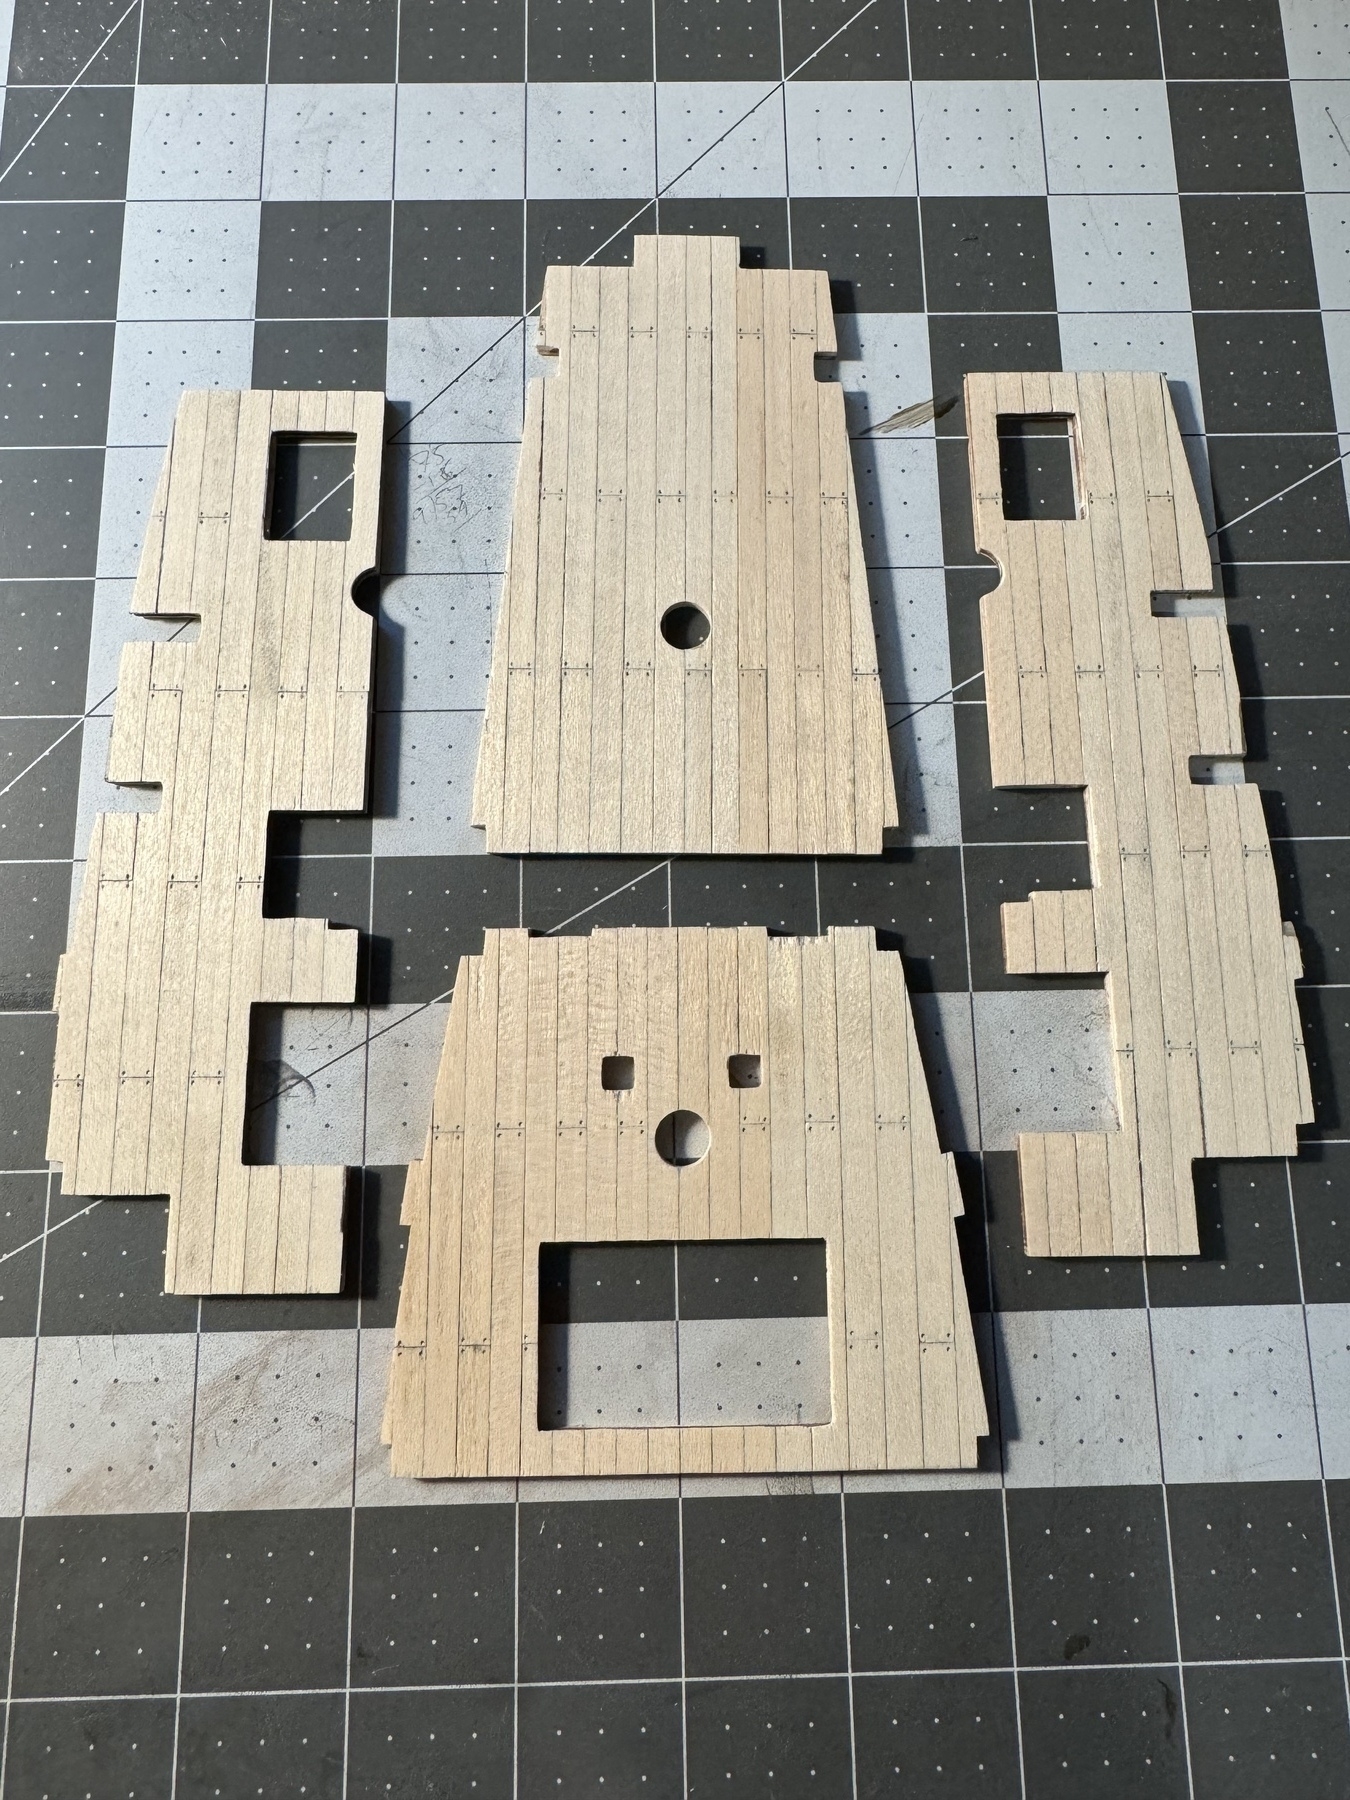
So that was about as far as I could go on Step H, so let’s look at Step I. In that one, I have to build some doors! 

Small, black doors with brass hinges and doorknobs to be attached to the flying dutchman model ship

Here they are in progress. And then I glued them all on. 

2 small black doors on the fore of the flying dutchman model ship.

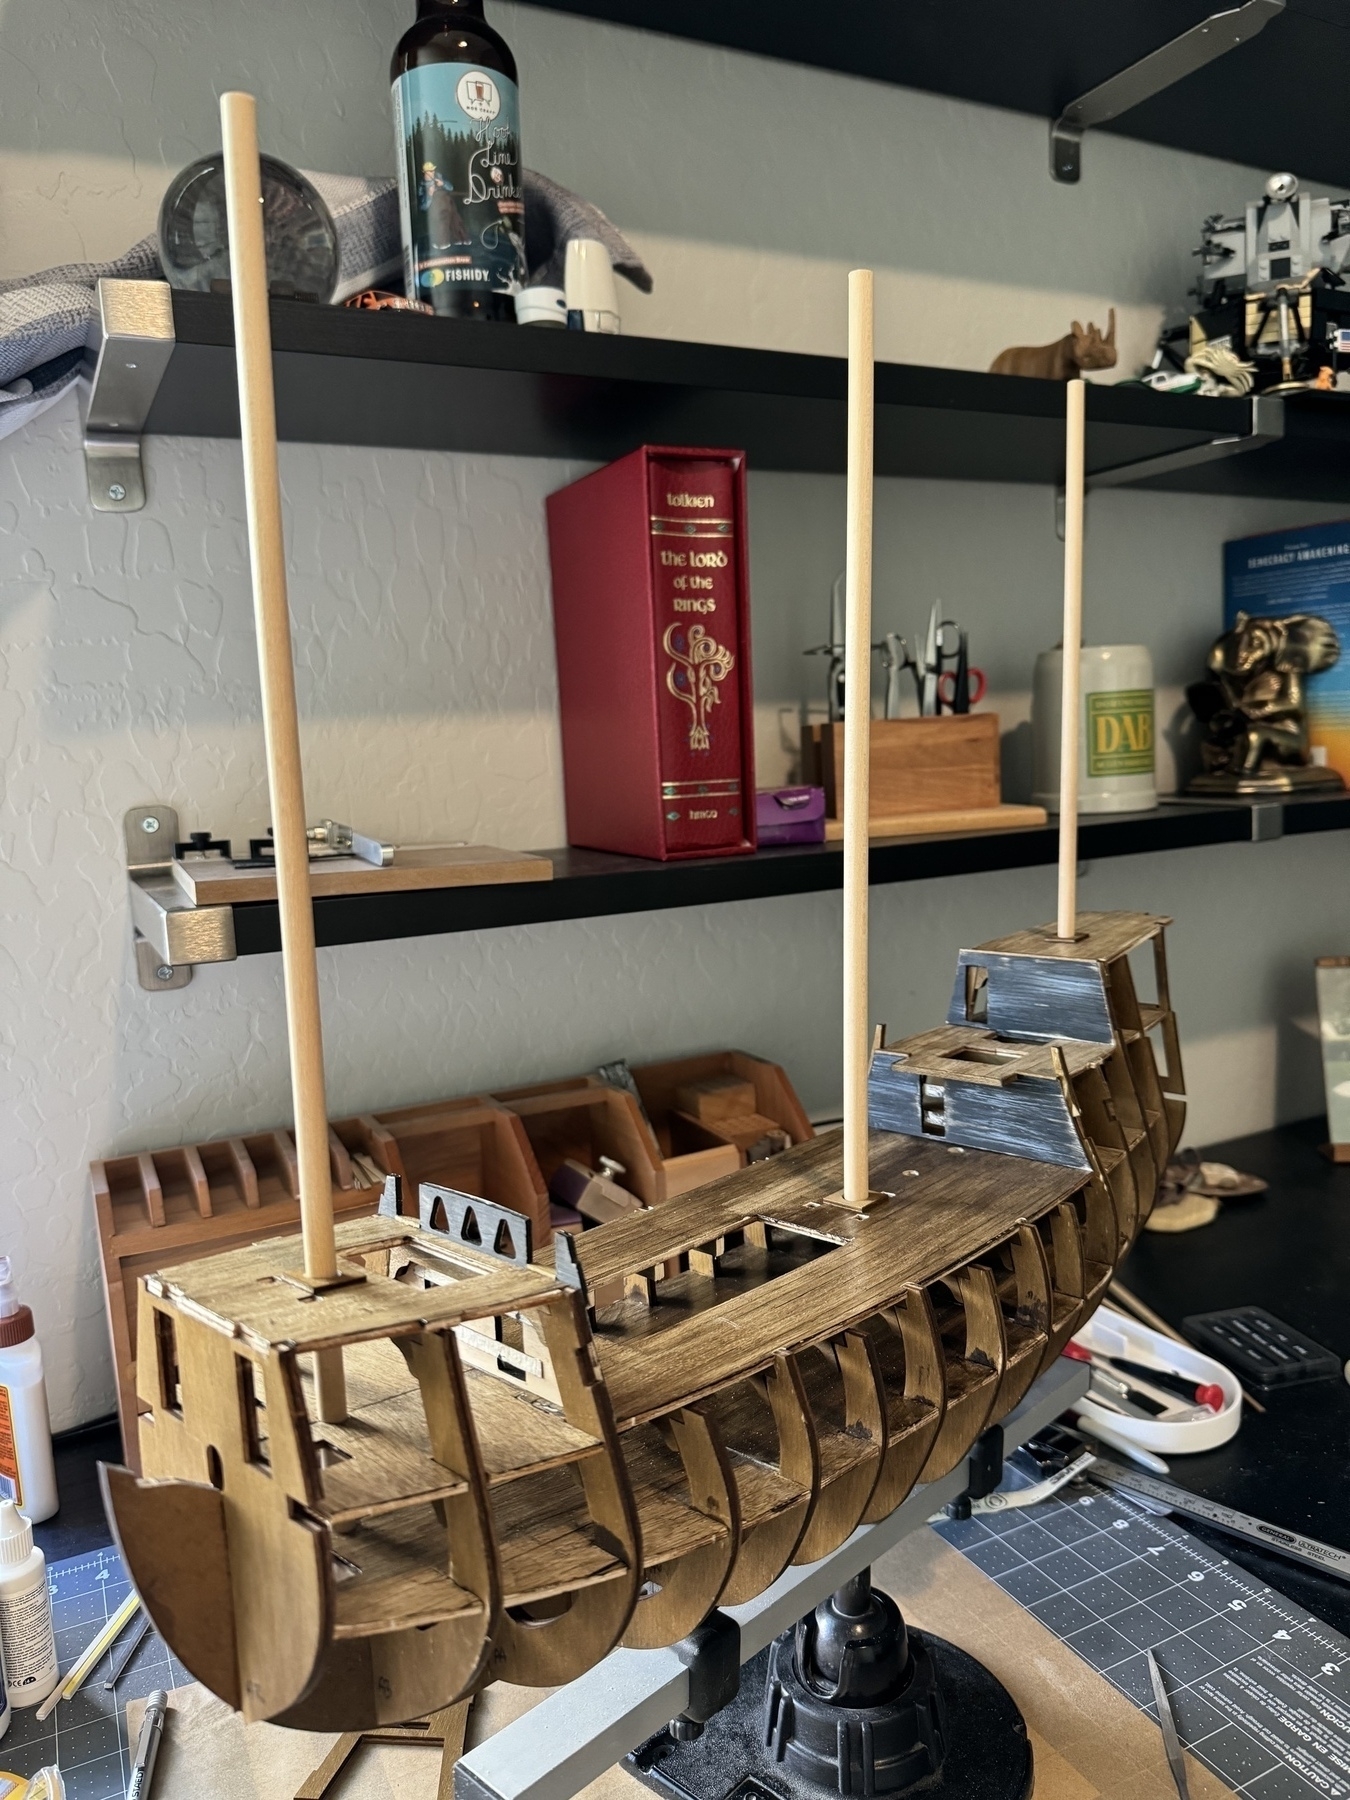
Here they are in the fore of the ship. 

And a couple in the aft. And you can see I installed the deck house as well. Those big holes in the deck are where the grates will go. 

Now it’s pretty much down to sanding and shaping the hull in preparation for planking. That’ll be Steps J, K, L, and M. So I’m stalled a bit right now. Once my mahogany arrives I can finish the grates, install them and that’ll pretty much complete Steps G, H, and I. The good news is, the wood arrived in the country and is just awaiting clearance through customs. Hopefully I’ll have them by the end of the week and can continue forward. 

Until then, take care, 

JIm

I made these five grates for step G. Now I’m supposed to frame each one in mahogany like that one there but I didn’t get enough in the kit to do that. 🫤 So I ordered some more. I’ll probably move on to Step H in the meanwhile.

Small grates that go on the deck of the Flying Dutchman model ship.

Flying Dutchman: Step F

Step F is complete! 

Wow, some of these steps go by quickly. 

View of the flying dutchman model ship with walls attached at mid-ships and at the stern.

Next up, in Step G, I get to build lots and lots of grates. Should be interesting. 

Here is a sneak preview of all the little bits I get to put on this model. This is fun. 

Those barrels will go in the bottom of the ship. That big old Flying Dutchman figurehead on the front and lots of bones that go on all over the place. 

JIm

A preview of things to come. Many, many months down the road.

Flying Dutchman model ship with masts in place.

Flying Dutchman: Step E

Step D is complete! 

I added several upper-deck-like things and a few walls. 

View from the front of the newly added upper decks and some walls on the flying dutchman model ship.


View from the rear/side of the flying dutchman model ship showing the newly added upper decks and a wall.

Not entirely sure what’s up with the staining of the decks. I’m using the same stain and the same wood planking as the other decks but these turned out significantly lighter than the others. I’m OK with this since this is supposed to be a ghost ship so overall it’s supposed to look worn out, beat up and spooky. Hopefully the mis-matched deck staining will just add to the charm. 

Next up, Step F where I start to put on some walls! 

Stay tuned. 

JIm

All trimmed and sanded and dots poked in them. Now to varnish and stain and put them on the boat.

Several deck pieces all trimmed and sanded smooth. Ready to be stained and attached to the Flying Dutchman model ship.

Even the desert can be full of foliage.

A mountain in the Sonoran desert in the Phoenix area with lots of desert foliage growing up around its base.

Planked up several sections of deck. Here is what they look like front and back. Next step, clean and shape them up.

Section of deck on the Flying Dutchman model ship with planks glued to them. Same sections of deck for the Flying Dutchman model ship except from the bottom side so you can see what is being covered by all the planks glued on.

Putting my copy of LOTR to good use weighing down some planking while the glue dries.

Hard cover version of Lord of the Rings being used as a weight to keep pressure on some planking while the glue dries.

Flying Dutchman: Step D

Step D is complete. 

View from the top of the finished upper deck of the Flying Dutchman model ship

For this step I had to attach cross-pieces to the bulkheads (you can see them through that big rectangle hole in the deck), then cut out and install the upper deck. Before doing that, the center portion had to be planked just like I planked the lower deck. Lots of 65mm long pieces of wood all glued down. The portions in the front and back of the ship aren’t planked because those will be rooms and you won’t see inside them when it’s all finished. Finally, I stained the deck with Judea Bitumen just like the lower deck. Actually, staining the deck is part of Step F, but I learned from doing the lower deck that it’s better to do that while it’s not attached to the boat. I think this staining job went much better than the lower deck. 

Here’s another view, more from the side. 

Side view of the Flying Dutchman model ship showing the upper and lower decks.

That’s it for now. Stay tuned for Step E where I attach some of the upper-upper-decks and even some walls! 

JIm

Flying Dutchman: Step C

Wow, step C completed. I’m moving along quickly here. 

Got the entire lower deck glued in place and added a few small details. A couple of stairs/ladders, and a capstan. 

View of entire lower deck of Flying Dutchman model ship.

This is a bit better view of the details (forgive the crappy lighting, you’d think I’d have better lighting here where I work on building this). 

Close up view of the lower deck of Flying Dutchman model ship showing a ladder to the lower hold and a capstan.

Next up, a little bit more work on the lower deck and then the upper deck. 

Stay tuned! 

Jim

Flying Dutchman: Step B

Step B is complete. 

Picture of the lower deck of the Flying Dutchman model ship all planked and varnished.

This is going to be the lower deck of the ship. Those five pieces are of plywood and I had to cut each one out, then cut a whole bunch of 65mm long strips of wood and glue them on. The lines between the planks and the dots are all made from pencil drawing along the sides or poking holes in the corners after they’ve been glued on. Then some sanding and finally a coat of clear, satin varnish. 

The next step, step C, I get to put those on the bulkheads and add some details. Stay tuned! 

JIm

From Terri Kanefield’s blog:

Here’s the thing to remember about democracy in America: We’ve never had a truly representational multicultural and multi-racial democracy.

During the past few decades, we have been moving toward one and this has triggered a powerful backlash. What we are seeing in the Republican Party is the backlash.

I think this is true. I hope we get to one.

Flying Dutchman Step A

The instruction book for the Flying Dutchman model has steps labeled A through X. Here is a picture of my completed Step A. 

The keel and bulkheads of the Flying Dutchman model completed

I had to cut out and stain the keel and all 15 bulkheads, then glue them in place making sure they’re square to the keel. (They mostly are.) 

So that’s it. My plan is to keep posing pictures of each step as it’s completed so stay tuned! Currently working on step B, planking the lower deck. 

Take care, 

JIm

And so it begins...

Start of building the Flying Dutchman model ship. Just keel and bulkheads showing.

Toward the end of my Bluenose build, I was swearing I was done building model ships. Then my wife saw this and convinced me to buy it. So now I’ve started another…The Flying Dutchman! 

JIm

A Bluenose Retrospective

As a bit of a retrospective, here are a variety of picture of my Bluenose model over time. 

The hull of the Bluenose model ship being planked.

This is the hull as I was finishing up planking it. This picture is from 2012. 

The deck of the Bluenose model before being planked.

This is the deck before it was planked. The hull is finished, now it was time to do the deck. 

Starting to plank the deck of the Bluenose model ship

This is how the deck was planked. Unlike the hull where it was a bunch of shorter pieces, the deck planking I did in long strips about half the length of the boat. 

Deck planking of the Bluenose model ship completed and stained.

All the decking is finished and stained. 

The hull of the Bluenose model ship being painted.

Here is the hull in the process of being painted. As you’ve seen elsewhere, it was black on the bottom, red on top, with a yellow stripe between the two, topped by white rails. 

Bluenose model ship with some of the deck housing being put into place.

Making more progress. This is from 2020 - 8 years after I finished the deck After the deck was done, I had to do all the stanchions (the little bits of wood sticking up from the deck holding up the rails) and then reshape and install the rails along the top. Was quite tedious. Then I finally got started on building all the deck housing stuff. Each of those things, hatches, entry ways, etc. are all fashioned from scratch. 

Close up picture of the winch and other deck machinery at the bow of the Bluenose model ship.

Close up of the dorys on the Bluenose model ship.

A couple of close ups of some of the stuff I had to build on the deck. Up top is the winch for hoisting the anchors and the gaffs. Below are the four Dorys I had to make from scratch. Yep, each one is individually crafted with ribs and planked. I made those little tiny oars myself too. Each one is about 1.5” long. 

The bowsprit of the Bluenonse model ship

After all the deck stuff was done it was time to get started on the masts. This is the bowsprit. 

Picture of the 2 masts on the Bluenose model ship

And here we see both the fore mast and main mast with their mast hoops in place. 

After the masts were completed and installed, it was time to start rigging. 

Close up of the ratlines on the fore mast.

And here I’m working on the ratlines that both help to stabilize the masts and allow a way for the sailors to climb up them to get to the sails on the top. This here is from 2023. 

The jib and jumbo jib of the Bluenose model ship

The foresail of the Bluenose model ship

Finally getting to the sails. 

And finally it is finished. 

Picture of the completed Bluenose model ship.

That’s a brief summary. If you go to my archive page, you should be able to  see all my boat-related posts from over the years. I haven’t been very consistent about documenting my progress and there are lots of gaps. But you can see a lot more of my early work on the ship. I hope you enjoy looking at all this. 

Take care, 

JIm

Finally Finished

It’s finally finished.

Picture of completed Bluenose model ship on stand beneath picture of the current Bluenose II

It’s actually been done for a while. I finished it up just before Christmas and never posted about it. I’m really happy with how it turned out. It’s been a long, long time in the making. Actually a bit proud of myself that I stuck with it and completed it. Feels good.

It’s proudly on display in our hallway beneath a picture of the current Bluenose II that resides in Lunenburg, Nova Scotia. My wife got me that picture for Christmas of 2022 for exactly this purpose. I enjoy walking down the hallway and saying, “Hi boat!” on a fairly regular basis. 

We went up to see the Bluenose II in September. Looks like I never posted about that. It’s a fairly close replica of the original that is still functioning. We got to sail on it on a harbor cruise. It was pretty darn amazing to see in real life things I’ve been working on for years in miniature. 

That’s all for now. 

JIm

How the Chicago Bears are Run

A SHORT PLAY IN 2 ACTS

ACT I HALLAS HALL GEORGE MCCASKEY TALKING TO NEWLY HIRED GM RYAN POLES DATE JANUARY 25, 2022

GEORGE Welcome to the Bears! Happy to have you here. Now that you’re here, you need to hire a head coach. Now me and my good friends already did the work for you and we have a list of 3 people who would make great head coaches. Now, you don’t have to pick someone off this list if you don’t want to, but I really, really like this list we came up with and would love it if you picked someone from this list … but, do whatever you want, you’re the GM.

POLES Thinking to himself: Fuck me. Already? Well, usually GMs get a second shot at hiring a head coach if the first one doesn’t work out. I can make this work for a couple of years, fire him and get my own guy in here.

Says out loud: Sounds good! I’ll take Eberflus.

ACT II HALAS HALL KEVIN WARREN’S OFFICE DATE: JANUARY 8, 2024 THE DAY AFTER THE BEARS LOSE TO GREEN BAY IN EMBARASSING FASHION, AGAIN

POLES Kevin, buddy, I wanna fire Eberflus, trade Fields, use the number one pick to get a QB, pair him with a great, modern, offense-minded head coach and take this team into the 21st century.

WARREN Sounds good to me, but we gotta take this to George.

POLES AND WARREN GO TO GEORGE’S OFFICE

WARREN George, to really make this team a modern NFL franchise that wins Super Bowls, we need to get a new QB. When we do that, we need to pair him with a new head coach who understand modern football and can run an exciting, modern offense. So we want to fire Eberflus and his staff, trade Fields, and go from there.

GEORGE No.

ALL THREE STARE SILENTLY AT EACH OTHER FOR A MOMENT

GEORGE Me and my good friends hand-picked Eberflus, we think he’s the right coach for the job. You need to make this work. End of discussion.

POLES AND WARREN LEAVE THE OFFICE START TALKING TO EACH OTHER AS THEY WALK DOWN THE HALL

POLES Fuck, now what?

WARREN I hear you man. We bring in Eberflus, tell him he’s gotta fire his offensive staff, maybe let him keep a couple of his guys to save face a bit, try to survive a couple of years, hope he doesn’t destroy our new QB then fire him and promote the OC to Head Coach.

POLES And if that doesn’t work, we’re all fired anyway.

WARREN Well, you are, I gotta finish building him a new stadium.

Latest Bluenose Update

Been a bit. Finished up the topping lift and topping lift tackle several days ago. 

Close up of topping lift and tackle on Bluenose model ship.

Today I just finished up the mast mast hoops on the main sail. 

Close up of mast hoops on main sail on Bluenose model

All that’s left are the quarter lifts and the flag halyards and then the ship is finished!

JIm

What Could Have Been

I’ll start by saying I don’t think Justin Fields will ever be a top-tier quarterback. I think he lacks the anticipation and instincts necessary to be in that top tier. He’ll forever be in Sando’s second-tier of quarterbacks—someone you can win “with", but not very often win "because of”. 

That said, I find myself wondering, what some other coaches could do if they had Fields on their team? What would he look like with McVay in LA, Shanahan in SF, Sirianni in Philly or even with LaFleur in Green Bay? Those coaches have shown they can get the most out of whoever they have quarterbacking for them. I know the conventional wisdom is Fields should or will go to Atlanta, but I still wonder just how great he’d be if he was on any of those other teams? If, like me, you think that would be pretty amazing to see, you really have to wonder about the coaching staff currently employed by the Chicago Bears. 

JIm

More Work on Main Sail

Main throat halyard and main peak halyard rigged. 

Close up of main throat, and main peak halyard rigging.

Also rigged up the main boom sheet (the triple block in the middle), and boom crutch tackle (the two on the sides). 

Main boom sheet and boom crutch tackle rigging on Bluenose model ship.

Just need the boom lift, and the quarter lifts and the rigging is complete. Getting closer. 

Hoisting the main sail in progress.

Main sail on Bluenose model.

Reef bands and points completed on the main sail and sail attached to the main boom. getting closer!

Main sail of bluenose model ship with reef bands and main boom attached.

Fore sail is finally finished!

View of fore sail on Bluenose

Three down, one to go. 

IMG 1209

Mast Hoops!

Got all the mast hoops on the fore mast tied to the fore sail. 

Mast hoops on fore mast